> ## Documentation Index
> Fetch the complete documentation index at: https://dripart-mintlify-update-manual-install-from-readme-30640.mintlify.site/llms.txt
> Use this file to discover all available pages before exploring further.

#  Runway API 节点 视频生成 ComfyUI 官方示例

> 本文将介绍如何在 ComfyUI 中使用 Runway 节点进行视频生成的相关工作流

Runway 是一家专注于生成式 AI 的科技公司，提供强大的视频生成功能。目前 ComfyUI 已集成 Runway API，你可以直接在 ComfyUI 中使用相关节点进行视频生成。

目前 ComfyUI 中原生集成了 Runway 的以下视频生成模型：

* Runway Gen3a turbo
* Runway Gen4 turbo
* Runway First Last Frame to video

<Tip>
  使用 API 节点需要保证你已经正常登录，并在受许可的网络环境下使用，请参考[API 节点总览](/zh-CN/tutorials/api-nodes/overview)部分文档来了解使用 API 节点的具体使用要求。
</Tip>

<Tip>
  请确保你的 ComfyUI 已经更新。

  * [ComfyUI 下载](https://www.comfy.org/download)
  * [ComfyUI 更新教程](/zh-CN/installation/update_comfyui)

  本指南里的工作流可以在 ComfyUI 的[工作流模板](/zh-CN/interface/features/template)中找到。如果找不到，可能是 ComfyUI 没有更新。

  如果加载工作流时有节点缺失，可能原因有：

  1. 你用的不是最新开发版（nightly）。
  2. 你用的是稳定版或桌面版（没有包含最新的更新）。
  3. 启动时有些节点导入失败。
</Tip>

## Gen3a turbo 图生视频工作流

### 1. 工作流文件下载

下面的视频的`metadata`中已经包含工作流信息，请下载并拖入 ComfyUI 中加载对应工作流。

<video controls className="w-full aspect-video" src="https://raw.githubusercontent.com/Comfy-Org/example_workflows/refs/heads/main/api_nodes/runway/gen3a_turbo_image_to_video/runway_image_to_video_gen3a_turbo.mp4" />

<a className="prose" target="_blank" href="https://raw.githubusercontent.com/Comfy-Org/example_workflows/refs/heads/main/api_nodes/runway/gen3a_turbo_image_to_video/runway_image_to_video_gen3a_turbo.json" style={{ display: 'inline-block', backgroundColor: '#0078D6', color: '#ffffff', padding: '10px 20px', borderRadius: '8px', borderColor: "transparent", textDecoration: 'none', fontWeight: 'bold'}}>
  <p className="prose" style={{ margin: 0, fontSize: "0.8rem" }}>下载 Json 格式工作流文件</p>
</a>

下载下面的图片作为输入图片

![ComfyUI Runway gen3a turbo image to video Input Image](https://raw.githubusercontent.com/Comfy-Org/example_workflows/refs/heads/main/api_nodes/runway/gen3a_turbo_image_to_video/steampunk.png)

### 2. 按步骤完成工作流的运行

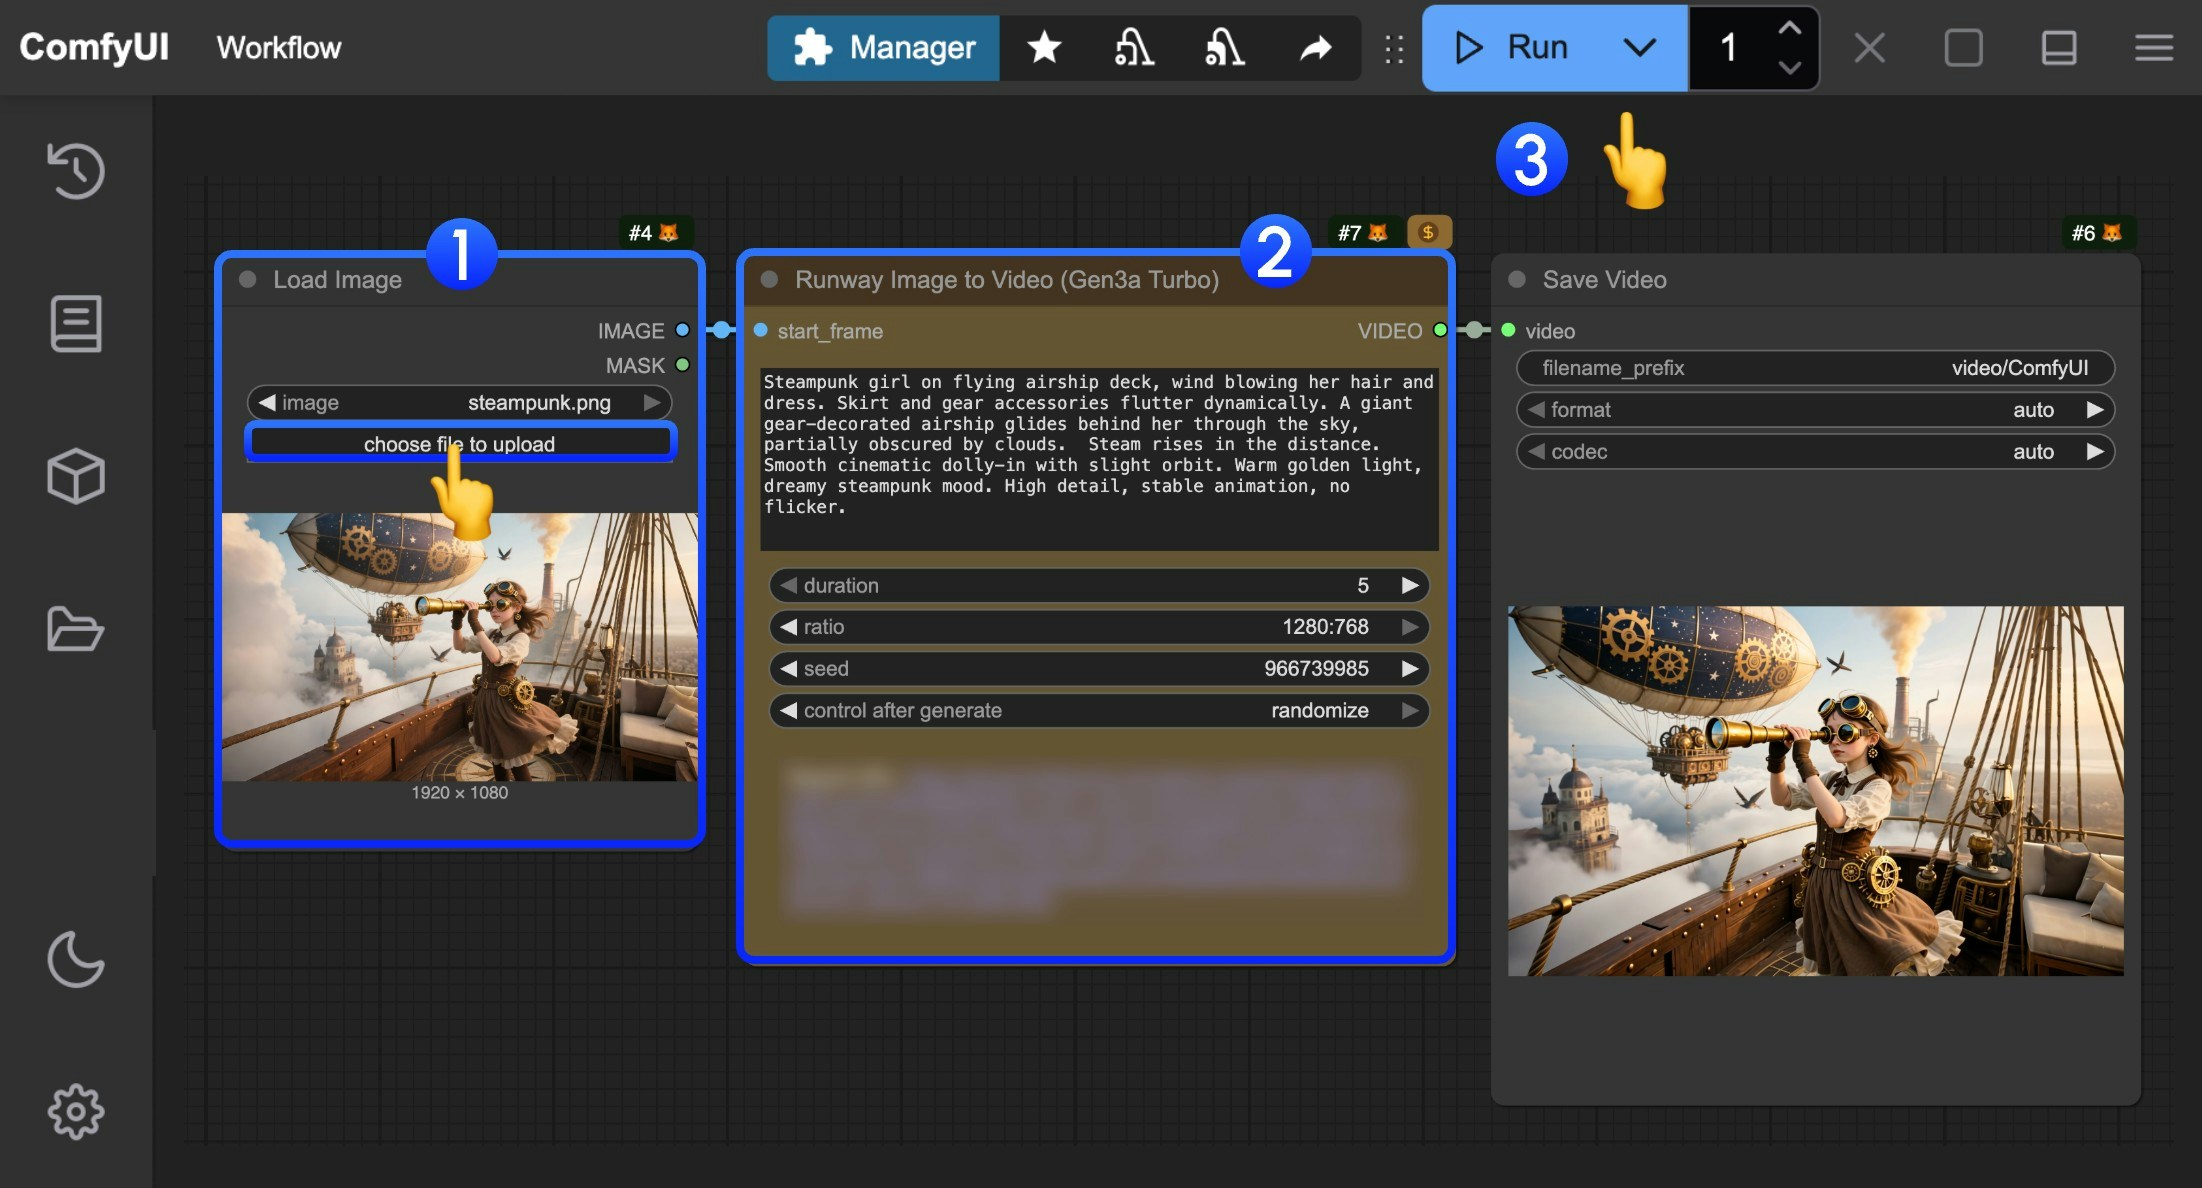
<img src="https://mintcdn.com/dripart-mintlify-update-manual-install-from-readme-30640/35jUGTc_FGdFfhe0/images/tutorial/api_nodes/runway/runway_gen3a_turbo_image_to_video_step_guide.jpg?fit=max&auto=format&n=35jUGTc_FGdFfhe0&q=85&s=4a58ce7bda8aeede251fb6c756f44834" alt="ComfyUI Runway gen3a turbo image to video Step Guide" width="2202" height="1188" data-path="images/tutorial/api_nodes/runway/runway_gen3a_turbo_image_to_video_step_guide.jpg" />

你可参考图片中的序号来完成最基础的文生图工作流运行：

1. 在 `Load Image` 节点中加载提供的输入图片
2. 在 `Runway Gen3a turbo` 节点中设置 `prompt` 描述视频内容，修改 `duration` 参数来设置视频时长, 修改 `ratio` 参数来设置视频宽高比
3. 点击 `Run` 按钮，或者使用快捷键 `Ctrl(cmd) + Enter(回车)` 来执行视频的生成。
4. 等待 API 返回结果后，你可在 `Save Video` 节点中查看生成的视频（右键菜单可以保存），对应的视频也会被保存至 `ComfyUI/output/` 目录下。

## Gen4 turbo 图生视频工作流

### 1. 工作流文件下载

下面的视频的`metadata`中已经包含工作流信息，请下载并拖入 ComfyUI 中加载对应工作流。

<video controls className="w-full aspect-video" src="https://raw.githubusercontent.com/Comfy-Org/example_workflows/refs/heads/main/api_nodes/runway/gen4_turbo_image_to_video/runway_gen4_turo_image_to_video.mp4" />

<a className="prose" target="_blank" href="https://raw.githubusercontent.com/Comfy-Org/example_workflows/refs/heads/main/api_nodes/runway/gen4_turbo_image_to_video/runway_gen4_turo_image_to_video.json" style={{ display: 'inline-block', backgroundColor: '#0078D6', color: '#ffffff', padding: '10px 20px', borderRadius: '8px', borderColor: "transparent", textDecoration: 'none', fontWeight: 'bold'}}>
  <p className="prose" style={{ margin: 0, fontSize: "0.8rem" }}>下载 Json 格式工作流文件</p>
</a>

下载下面的图片作为输入图片

![ComfyUI Runway gen4 turbo image to video Input Image](https://raw.githubusercontent.com/Comfy-Org/example_workflows/refs/heads/main/api_nodes/runway/gen4_turbo_image_to_video/godfather.jpg)

### 2. 按步骤完成工作流的运行

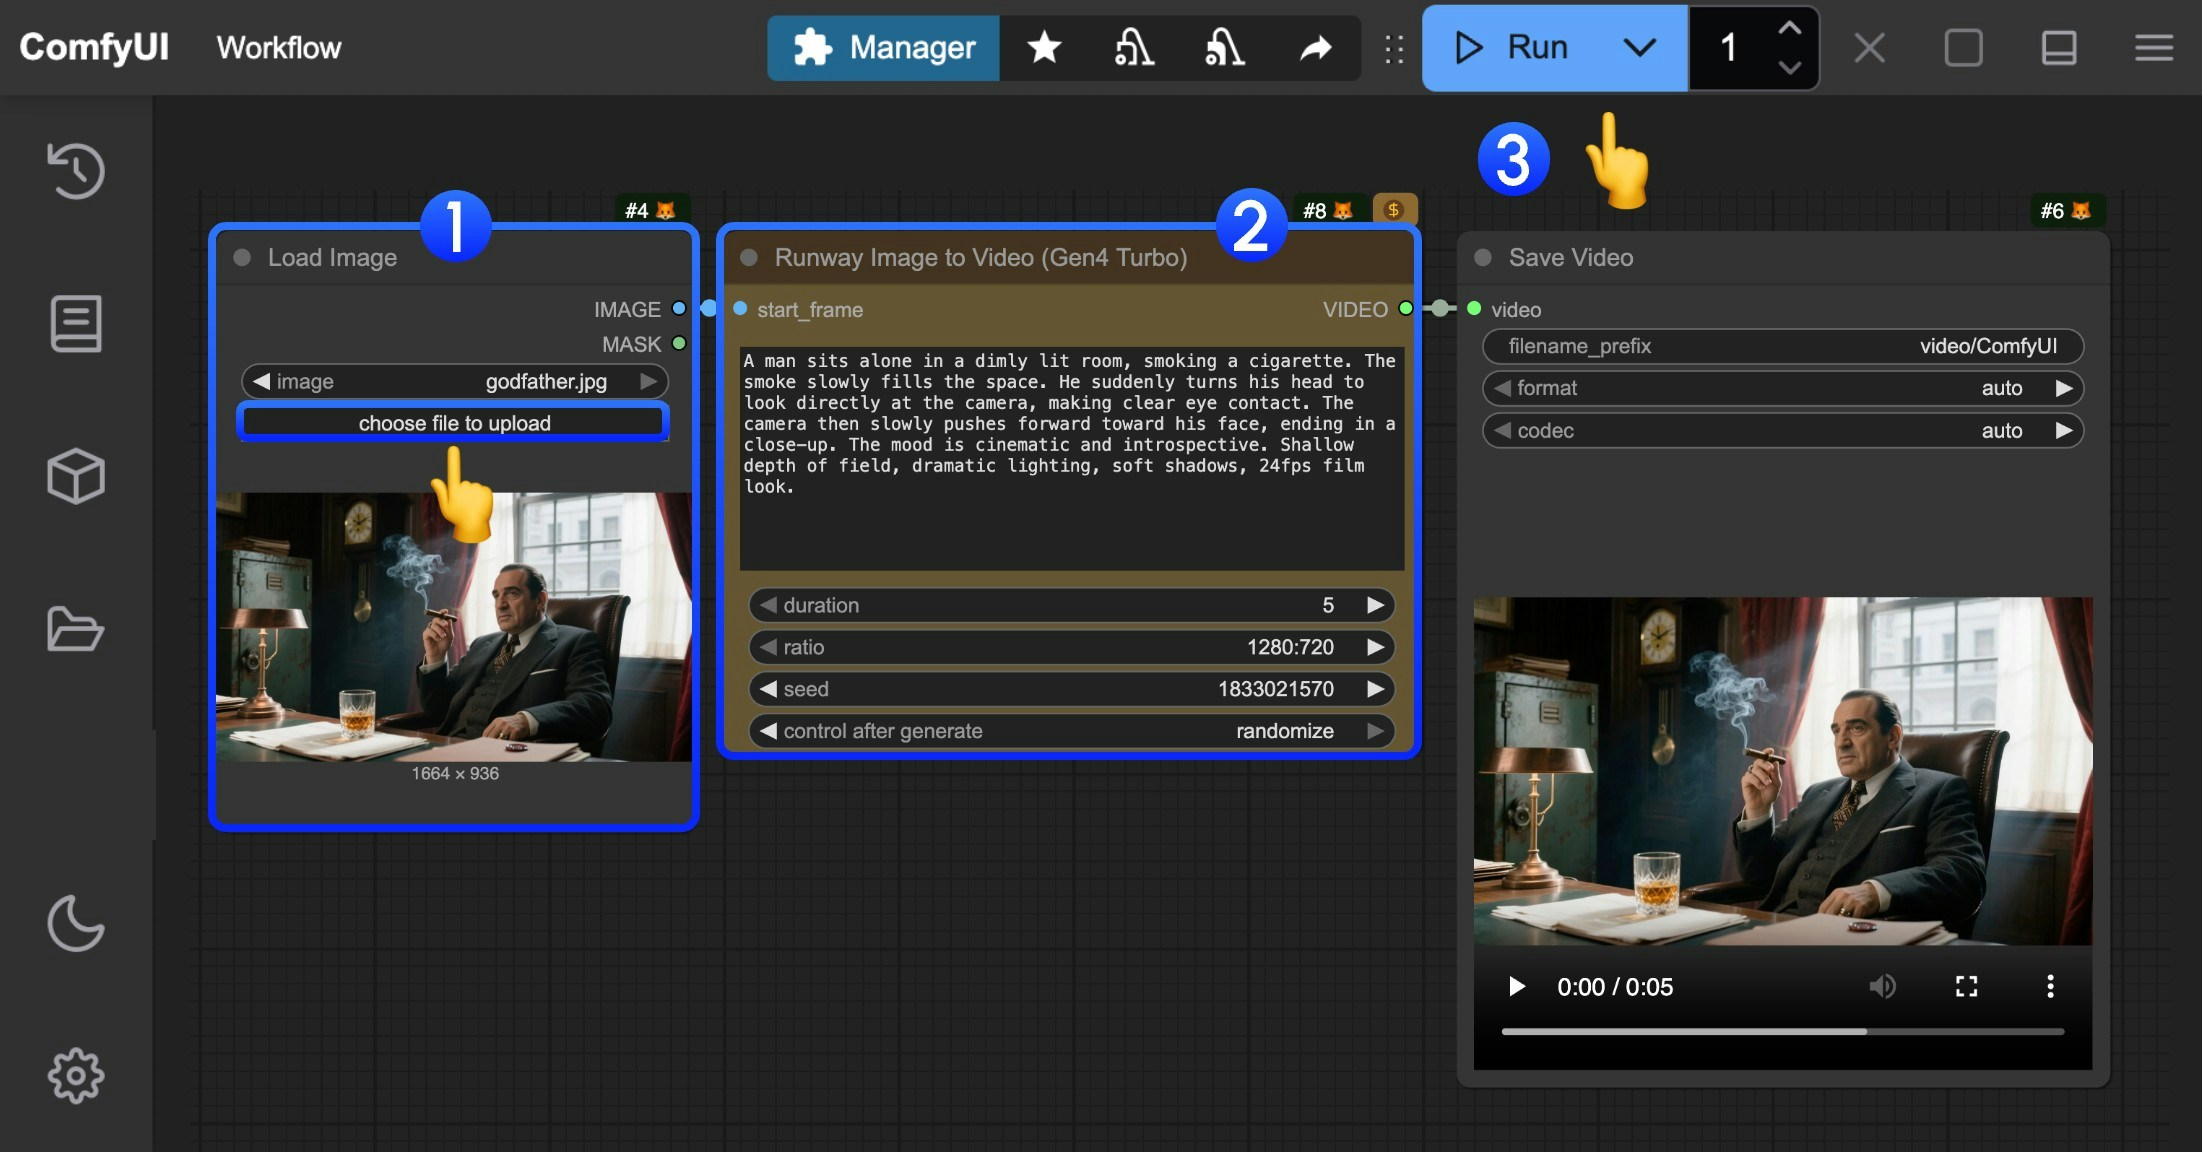
<img src="https://mintcdn.com/dripart-mintlify-update-manual-install-from-readme-30640/35jUGTc_FGdFfhe0/images/tutorial/api_nodes/runway/runway_gen4_turbo_image_to_video_step_guide.jpg?fit=max&auto=format&n=35jUGTc_FGdFfhe0&q=85&s=401520ceec8d0809f1b8320e14d9ca29" alt="ComfyUI Runway gen4 turbo image to video Step Guide" width="2202" height="1152" data-path="images/tutorial/api_nodes/runway/runway_gen4_turbo_image_to_video_step_guide.jpg" />

你可参考图片中的序号来完成最基础的文生图工作流运行：

1. 在 `Load Image` 节点中加载提供的输入图片
2. 在 `Runway Gen4 turbo` 节点中设置 `prompt` 描述视频内容，修改 `duration` 参数来设置视频时长, 修改 `ratio` 参数来设置视频宽高比
3. 点击 `Run` 按钮，或者使用快捷键 `Ctrl(cmd) + Enter(回车)` 来执行视频的生成。
4. 等待 API 返回结果后，你可在 `Save Video` 节点中查看生成的视频（右键菜单可以保存），对应的视频也会被保存至 `ComfyUI/output/` 目录下。

## 首尾帧视频生成工作流

### 1. 工作流文件下载

下面的视频的`metadata`中已经包含工作流信息，请下载并拖入 ComfyUI 中加载对应工作流。

<video controls className="w-full aspect-video" src="https://raw.githubusercontent.com/Comfy-Org/example_workflows/refs/heads/main/api_nodes/runway/first_last_frame_to_video/runway_first_last_frame.mp4" />

<a className="prose" target="_blank" href="https://raw.githubusercontent.com/Comfy-Org/example_workflows/refs/heads/main/api_nodes/runway/first_last_frame_to_video/runway_first_last_frame.json" style={{ display: 'inline-block', backgroundColor: '#0078D6', color: '#ffffff', padding: '10px 20px', borderRadius: '8px', borderColor: "transparent", textDecoration: 'none', fontWeight: 'bold'}}>
  <p className="prose" style={{ margin: 0, fontSize: "0.8rem" }}>下载 Json 格式工作流文件</p>
</a>

下载下面的图片作为输入图片

![ComfyUI Runway gen4 turbo image to video Input Image](https://raw.githubusercontent.com/Comfy-Org/example_workflows/refs/heads/main/api_nodes/runway/first_last_frame_to_video/first.jpg)
![ComfyUI Runway gen4 turbo image to video Input Image](https://raw.githubusercontent.com/Comfy-Org/example_workflows/refs/heads/main/api_nodes/runway/first_last_frame_to_video/last.jpg)

### 2. 按步骤完成工作流的运行

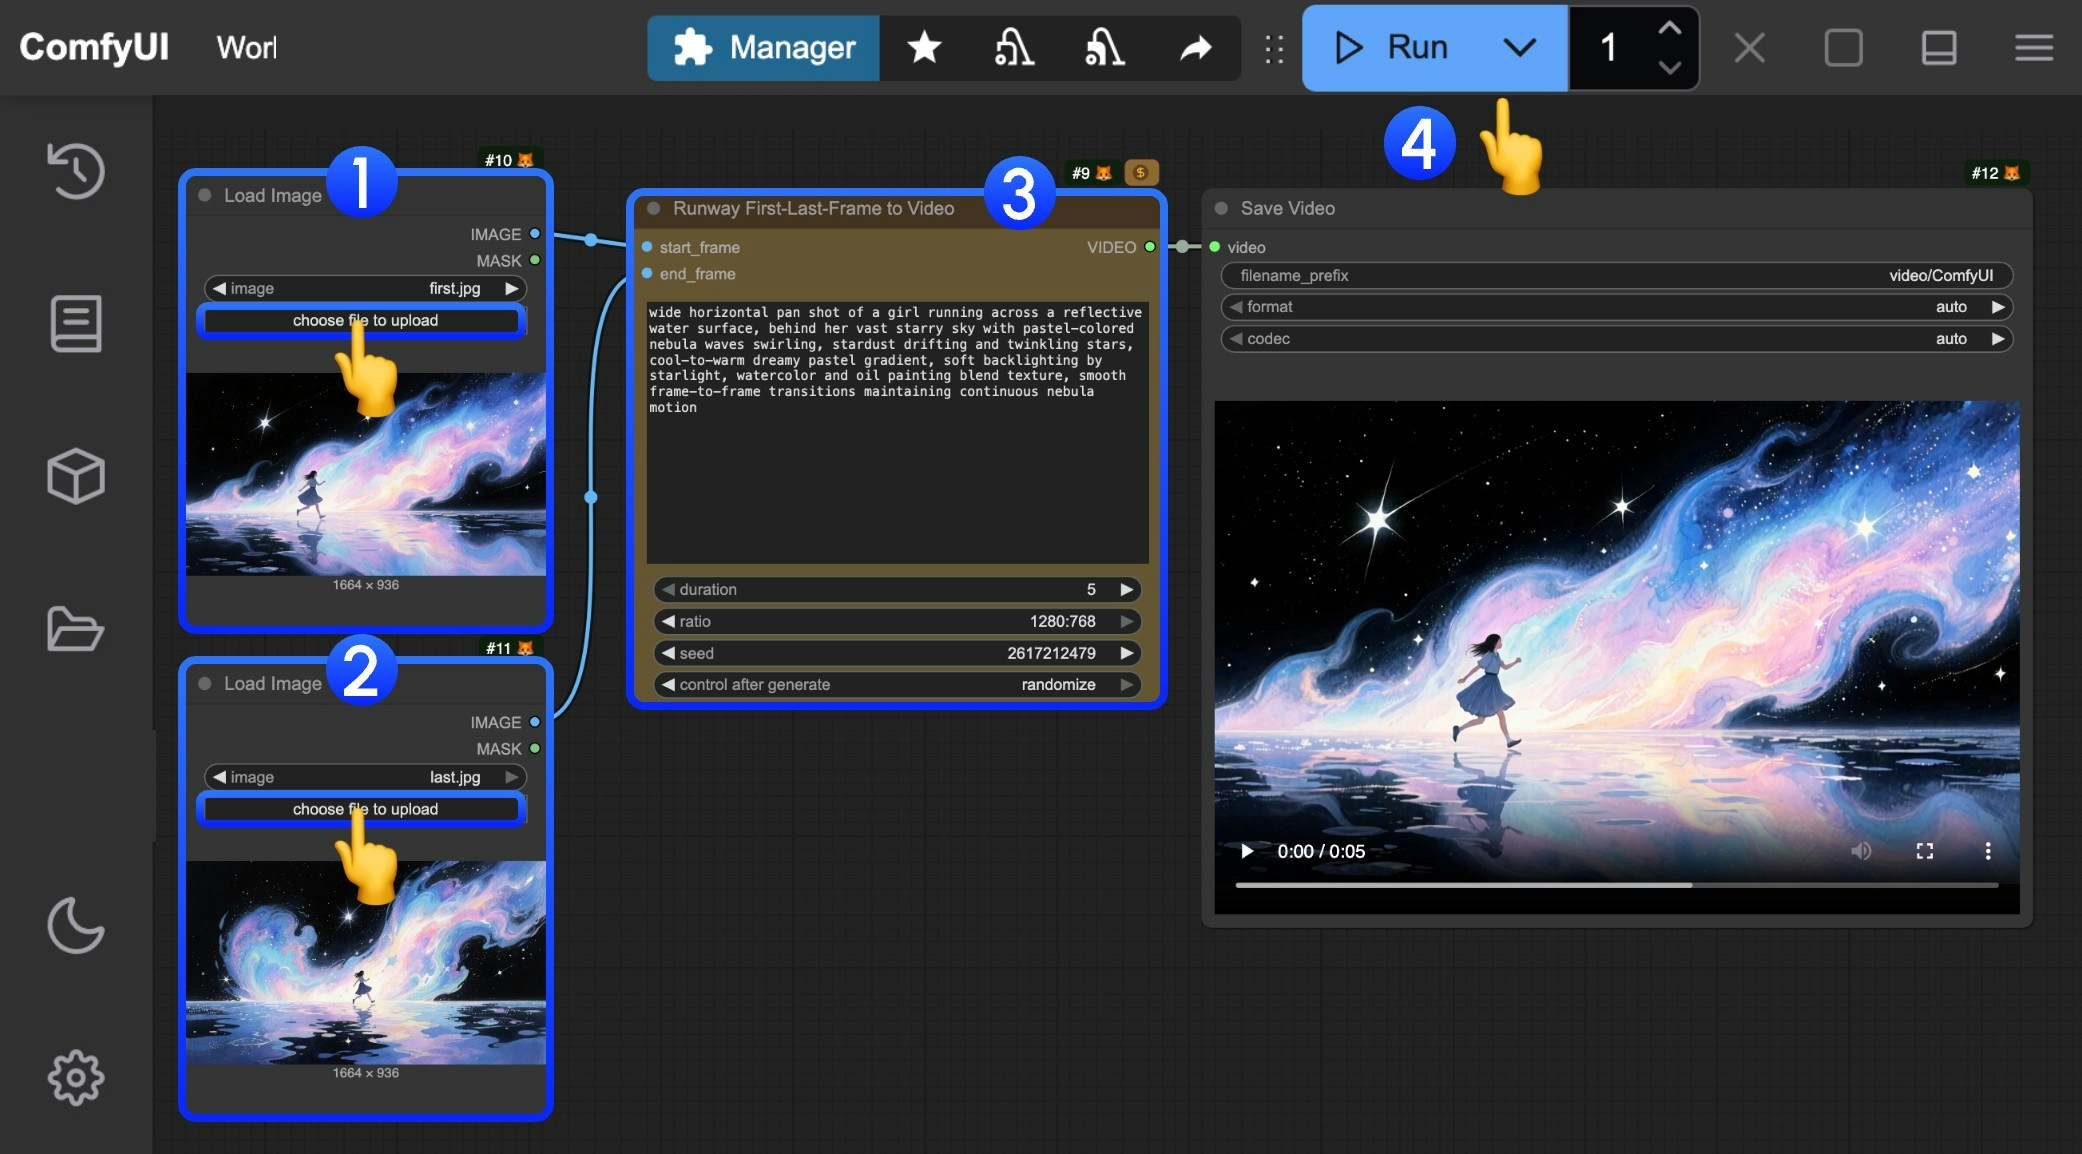
<img src="https://mintcdn.com/dripart-mintlify-update-manual-install-from-readme-30640/35jUGTc_FGdFfhe0/images/tutorial/api_nodes/runway/runway_first_last_frame_step_guide.jpg?fit=max&auto=format&n=35jUGTc_FGdFfhe0&q=85&s=a3e68ecb114bdaf4783ef5e7006f308a" alt="ComfyUI Runway gen4 turbo image to video Step Guide" width="2082" height="1154" data-path="images/tutorial/api_nodes/runway/runway_first_last_frame_step_guide.jpg" />

你可参考图片中的序号来完成最基础的文生图工作流运行：

1. 在 `Load Image` 节点中加载起始帧
2. 在 `Load Image` 节点中加载结束帧
3. 在 `Runway First-Last-Frame to Video` 节点中设置 `prompt` 描述视频内容，修改 `duration` 参数来设置视频时长, 修改 `ratio` 参数来设置视频宽高比
4. 点击 `Run` 按钮，或者使用快捷键 `Ctrl(cmd) + Enter(回车)` 来执行视频的生成。
5. 等待 API 返回结果后，你可在 `Save Video` 节点中查看生成的视频（右键菜单可以保存），对应的视频也会被保存至 `ComfyUI/output/` 目录下。